This topic covers the basic entry of work, leave taken, allowance, sundry deduction, overheads and payments to other agencies as part of your pay input process.
Refer to Pay Input Process for an overview of the entire pay process performed each week (or pay period).
Templates
Templates are one of the time-saving features in goPayroll - just create the pay entries as you would normally want them to appear each pay (even if you then need to adjust them a bit for leave etc.) then click the Template tool to save it that way for next time.
- to view the template payslip entries - right-click the employee's name and select Template payslip.
- to clear template entries - right-click the employee's name and choose Delete template
- to modify template entries, just amend the pay inputs the way you want them to appear normally and re-save using the Template tool.
Payrun loading options
There are numerous ways to get data into payroll of course, including:
- import from our ESS system (where staff can record their own time and leave)
- import from our API (lets external systems access and update payroll data)
- import from timeclocks, CSV files and attendance systems (WebHR, Deputy, Vinea, WorkflowMax, WageLoch and more...)
- simple timesheet tool
- manual entries and time-saving templates
Further information is available in the Learn section of our website, but happy to work through any scenario you need help with.
The basics
In general, employees should be pre-selected in Who To Pay (unless you're importing from one of the many other rapid input sources)
All new entries in SmoothPay are made using the [+] button at the foot of each input area (you'll see these at the foot of the employee list, codes lists, pay input type lists, pay and leave history lists etc.
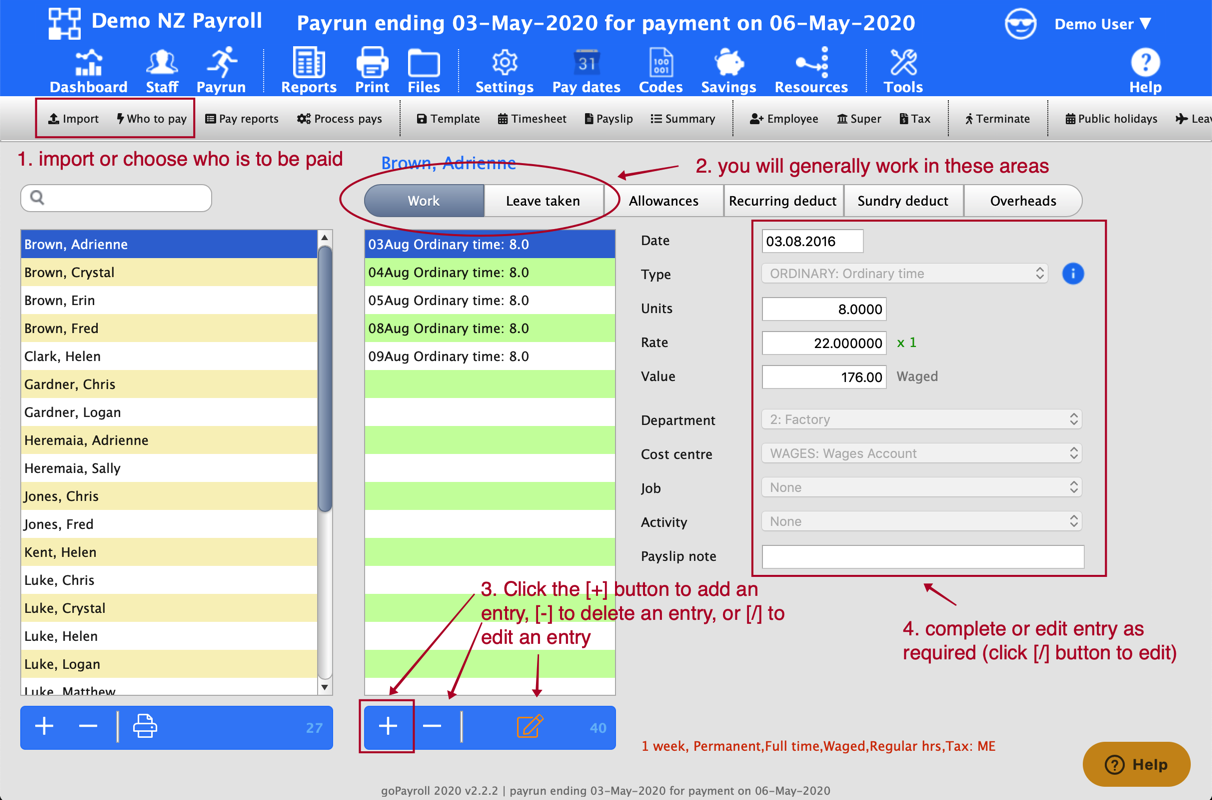
This example is for the Payrun..Work area where you record Ordinary, Overtime and Public Holiday (worked) entries:

There is no practical limit to the number of entries you can make in an employee's pay input - it all depends on how much analysis you require.
Some employers simply record a single entry for each of Ordinary, Overtime etc., others prefer to have entries per day and possibly even further broken down into day, cost centre, job, activity - the analysis options are extremely powerful and allow you to cater for almost any accounting requirements.
To DELETE an entry, simply highlight it and click the [-] button
To EDIT an existing entry, simply highlight it and click the [/] edit tool
Adding a work entry
Refer to the diagram in The basics (above) for an example screenshot.
- Select the employee being paid (previously selected in Who To Pay)
- Make sure you're in the Payrun..Work section
- Click the [+] button to add an entry (you can also use the Timesheet tool to enter daily Ordinary time totals)
- Edit any entries to suit (time type, date, hours worked, cost centre etc)
NOTE: Pay rate, cost centre etc are generally inherited from the employee's contract settings, but feel free to change anything here as needed for your payroll costing journal
Adding a leave entry
Refer to the diagram in The basics (above) for an example screenshot.
- Select the employee being paid (previously selected in Who To Pay)
- Make sure you're in the Payrun..Leave taken section
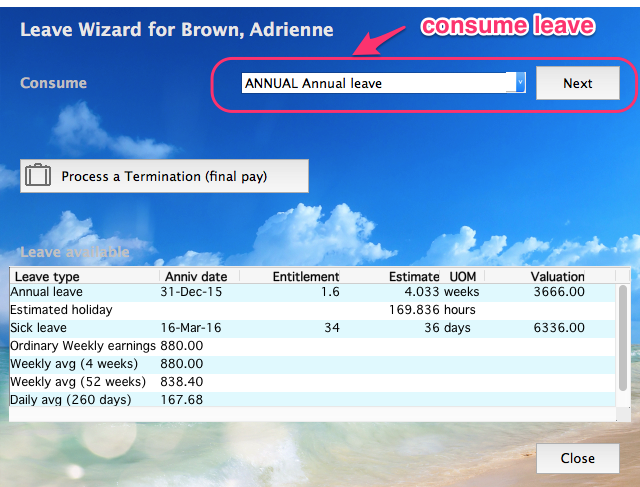
- Click the [+] button to add an entry - a leave wizard will be displayed which provides selection of the leave type and units to be consumed.

- Edit any entries to suit (date, cost centre etc)
NOTE: Pay rate, cost centre etc are generally inherited from the employee's contract settings
NOTE2: the leave wizard also provides for termination pays which automatically calculates any remaining leave entitlement and flags the employee to be automatically terminated at the end of the pay process.
Adding an allowance entry
Refer to the diagram in The basics (above) for an example screenshot.
- Select the employee being paid (previously selected in Who To Pay)
- Make sure you're in the Payrun..Allowances section
- Click the [+] button to add an entry
- Edit any entries to suit (allowance type, date, units, rate, cost centre etc)
TIP: The Net Wizard allows you to enter an amount to be paid in-the-hand and SmoothPay will automatically work out the gross amount (before tax and super) that is required to produce that amount
Adding a sundry deduction entry
Refer to the diagram in The basics (above) for an example screenshot.
- Select the employee being paid (previously selected in Who To Pay)
- Make sure you're in the Payrun..Sundry Deductions section
- Click the [+] button to add an entry
- Edit any entries to suit (sundry deduction type, date, units, rate, cost centre etc)
NOTE: This is typically only used for recovery of advance pay - it is NOT used for deductions that are then paid to third-parties (such as rent, additional super, union fees, fines, child support etc - refer to Payments to other Agencies below)
Adding an overhead entry
Refer to the diagram in The basics (above) for an example screenshot.
- Select the employee being paid (previously selected in Who To Pay)
- Make sure you're in the Payrun..Overheads section
- Click the [+] button to add an entry
- Edit any entries to suit (overhead type, date, units, rate, cost centre etc)
Please refer to the Overheads guide for more information.
Payments to other agencies
Refer to the diagram in The basics (above) for an example screenshot.
- Select the employee
- Make sure you're in the Staff..Payments or Payrun..Payments section
- Click the [+] button to add an entry
- Edit any entries to suit (agency, amount to be deducted each pay period and total/balance to be paid off if applicable) - these payments will generally appear in your direct credit file as long as the agency has been set up correctly with a bank account.
Please refer to the Recurring Payments to Agencies guide for more information.
Storing the pay input as a template (or Standard Pay)
The template tool in the toolbar stores the current Work, Allowances and Overheads entries as the standard template for the selected employee (this is a great time-saver as it allows you to concentrate on entering any changed hours rather than having to re-add standard entries every pay period).
Anything outside those areas (Payments to other agencies, Bank accounts, super fund settings etc.) are NOT stored in the template as they take effect automatically any time an employee is paid.
Any template pays get loaded automatically when an employee is selected for pay in Who To Pay or when the first entry is imported from an external source, such as ESS, API, timeclock, CSV etc. (which is why this is the first step of the pay process).
* end*